Saturday, August 31, 2013

Rain City Lacquer. Local Indie Lovin!

I was so excited to stumble upon a local Indie polish maker!
Not only that but her polishes are just super cute and unique. Of course the names are a huge part of it!
Rain City Lacquer is based in the Seattle area. I was lucky enough to receive 4 polishes to swatch and review. Usually I post one polish at a time. But,I just had to share all 4 at once.
So, lets get started!
Warning!! Heavy Amounts of Pictures.

The bottles are incredibly cute. The tag does not get in the way for me. 

 Note: Each swatch is two coats over one coat of white polish from Sinful Colors in Snow Me White

First off is Seattle Sunrise
This is a milky consistency in a pinky peach color with to may glitters to name. But the glitter combo is perfect to describe our sun rises of the Cascades.

Natural Light
This polish needs 2 coats to get the full effect. I was unsure about it until I put the second coat on. The glitter applied very evenly. 
If you are a coral,peachy pink kinda gal,then this is definitely for you!

Light Box

Next up is Mint Rainier.
This is my favorite out of all 4. Not only is the play on words name super cute but the base shimmer was really nice to have on in this hot weather. Its very cool. Almost like a fresh breath mint.
I did not want to take it off. It will for sure be a must for some winter nail art.
Application was also very even. No glitter placement necessary.

Natural light

Light Box

This one is Raindrops on Roses
Another milky base in a light rose pink with black square and strip glitter.White rectangle and star glitters. And pink small hex and large diamond glitter.
This one also applied very evenly. I do with there was more stars. But I really love the base color.

Natural light

Light Box

Last is Market Bouquet
A beautiful glitter bomb to represent the fresh flowers sold at the local farmers markets.
I did have to do some glitter placement. But that is normal with such large glitters. I love the little butterfly glitters!

Natural light

Light Box

So, what do you think?
Check out her site. There are such amazing polishes.
Tuesday, August 20, 2013

More Nail Decals....with a twist

For this pictorial I wanted to show you how to fit a larger temporary tattoo on all your nails. It makes each nail different and still continues with the design. Like a tiny mural. 


Products used:
Temporary tattoo. I am using some from Essence Floral Grunge Collection
A lint free cotton round or a small piece of paper towel
Tweezers
My base color is by Morgan Taylor in No Way Rose
Topped off with Seche Vite


Make sure your base coat is completely dry before starting the transfer process.
Cut out your desired tattoo.Make sure you have a straight cut on one side of the cut out. This will be your guide when figuring out measurement for each nail. Do NOT remove plastic film yet.
Bend the tattoo paper slightly to help form around the nail to get a better measurement. 
Start with one end of the tattoo and one finger at a time as shown in the pictures.
Make a small cut in the paper to indicate the width of the nail. Then remove it from your nail and finish the straight cut.
Now move on to the next nail with the same technique until you have all your pieces ready.

At this point remove all the plastic film and set aside out of the way.
Add some water to your cotton round and set aside.
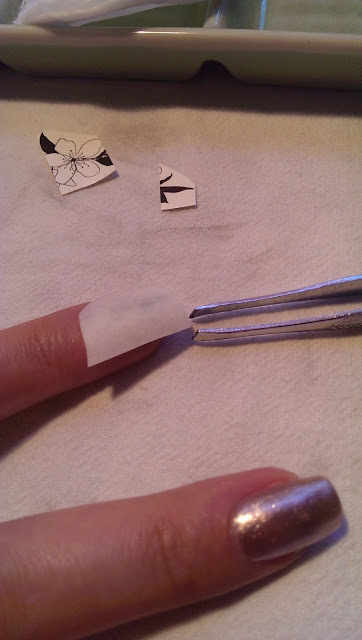
Be sure you have the correct piece of the tattoo for your first finger. Bend the  tattoo paper again to form around the nail with the tattoo facing down. While holding it in place put the damp cotton round on it for 5 to 10 seconds.

With your tweezers,carefully pull away the paper to reveal the transfer. Continue this process for the rest of the nails.

With acetone and a brush or q-tip clean up around the edges.

Seal with a clear coat and your done!


Monday, August 19, 2013

Liquid Sky Lacquer, TGIF. Swatch

This is another polish that came in my winnings from a nail art contest on Instagram.
The base is by Live Life Polished to see that swatch click here

The swatch on top is by Liquid Sky Lacquer in TGIF
I am loving this glitter bomb combo.The white rectangles are very unique.
This is one coat and then some glitter placement with my dotting tool.


Direct Sunlight

Light box


Sunday, August 18, 2013

Live Life Polished, Green With Envy. Swatch

I won a nail art contest a couple weeks back and received a few indie polishes as part of the prize pack. So I decided to swatch them because I just love all of them!
Today is Green With Envy by http://livelifepolished.storenvy.com/

The swatch is 2 coats over one coat of white base.
This is a creamy neon. Easy to apply and dries matte.Its quite bright in real life. I still haven't figured out all my camera settings yet.

Indirect sunlight. 

Light box


Thursday, August 1, 2013

Doctor Lacquer Go Tropical Set

This is Doctor Lacquers Go Tropical UV polishes.
Doctor Lacquer

Product Description 
These UV polishes are inspired by must-try tropical fruits, which are represented by both their indoor & outdoor colors.
Dragonfruit is a color-changing polish which is creamy gray indoors and turns creamy purple outdoors! It has an amazing array of black, white, and gray glitters (including dots!) which can remind you of dragonfruit seeds!
Pomelo is a color-changing polish which is a white crelly base indoors and turns to a pink crelly outdoors! It has numerous orange, yellow, pink, and white hex, square, and dot glitters!
Soursop is a color-changing polish which is a pistachio green crelly indoors and turns to a dusty eggplant purple crelly outdoors! Green and blue dots, bars and hexes found in soursop!

DISCLAIMER: Dries to a waxy finish. Intensity of color change depends on the intensity of sunlight (UV).

Dragon Fruit
The left is out of the sun. The right is in direct sunlight.

Pomelo

Soursop

Thoughts:
I really love these polishes. To be honest I didn't purchase them. My mom had them sitting on her desk and I took the liberty of swatching them right then and there. They caught my eye right away! I was not disappointed at all. Each swatch is 2 coats. Very easy to apply. Dries almost mad. You will need a top coat for sure to help the drying process. But so worth it! They have so much depth.
And the set is on sale right now!
Just beautiful really.